Outdoor Patio Ideas on a Budget
Transform your backyard with affordable patio ideas. DIY paving options, simple pergola builds, repurposed materials, and staged construction make outdoor living accessible without overspending.
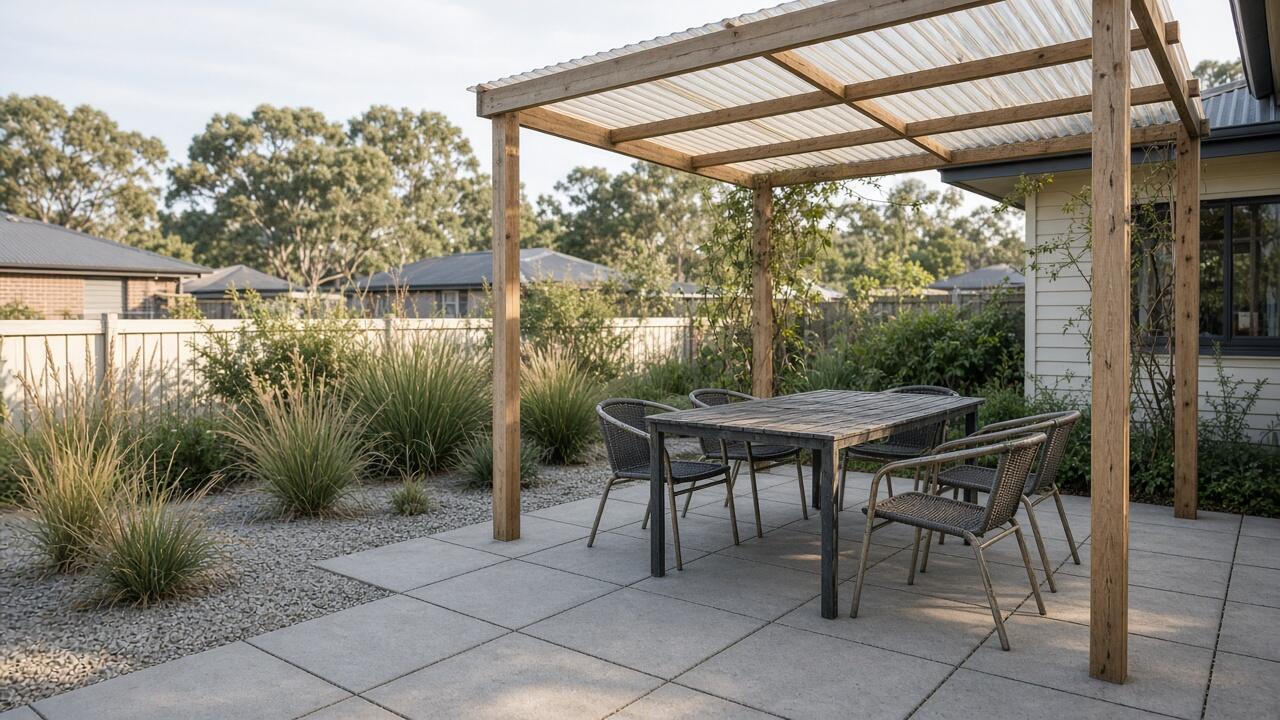
Creating comfortable outdoor living spaces needn’t drain renovation budgets. Smart material choices, staged construction, strategic DIY work, and creative use of repurposed elements deliver functional, attractive patios for Melbourne and Peninsula properties at a fraction of professional landscape design costs. Budget constraints actually force clever prioritisation—focusing spending on essentials whilst deferring cosmetic refinements builds usable spaces faster.
The difference between budget and expensive patios lies more in material selection and construction approach than overall enjoyment or functionality. Simple pavers over complex crazy paving, basic timber pergola frames instead of elaborate hardwood structures, and DIY labour where skills permit all reduce costs substantially whilst delivering the essential elements: flat stable surfaces for furniture, weather protection through shade structures, and defined outdoor zones for entertaining and relaxation.
Understanding where to invest limited budgets, which elements suit DIY capability, and how staging construction spreads costs over multiple seasons helps Australian homeowners create practical outdoor patios without the $15,000-30,000 price tags professional full-service installations command.
Smart Paving Choices
Ground surface determines most patio budgets—choosing wisely here frees funds elsewhere.
Concrete Pavers
Why budget-friendly:
- Affordable materials: $40-70 per square metre
- Widely available (Bunnings, landscape suppliers)
- DIY-friendly installation (sand bed, no special skills)
- Durable Australian product
- Easy future expansion or repair
Installation approach:
- Excavate 150-200mm depth (hire $100-150 per day for larger areas)
- 100-150mm compacted crushed rock base ($40-60 per tonne delivered)
- 30-40mm sand bed ($50-70 per tonne)
- Lay pavers tight, cut edges with angle grinder and diamond blade
- Sweep polymeric sand into joints ($25-40 per bag)
Cost example (20 square metre patio):
- Pavers (400x400mm): $800-1,400
- Base rock (3 tonnes): $120-180
- Sand bed (1 tonne): $50-70
- Polymeric sand: $50-80
- Edge restraint: $80-120
- Equipment hire: $100-150
- Total: $1,200-2,000 materials + DIY labour
Design tips:
- Avoid complex patterns (increases cutting and waste)
- Single paver size simplest (400x400 or 450x450mm)
- Light colours stay cooler summer (cream, beige, light grey)
- Create levels with step-downs rather than curves (cheaper to edge)
For comprehensive comparison of paver types, patterns, and alternative paving materials, see our guide on paving ideas for Australian properties.
Exposed Aggregate Concrete
Budget advantages:
- Mid-range cost: $80-120 per square metre installed
- Seamless appearance (no joints)
- Excellent slip resistance
- Professional pour more affordable than you’d expect
- Durable, long-lasting surface
When it makes sense:
- Larger patios (15+ square metres where labour amortises)
- Curved or irregular shapes (concrete flexibility advantage)
- Can’t DIY paving (professional concrete competitive with DIY pavers once labour factored)
- Want low-maintenance surface (no joint sand to maintain)
Cost considerations:
- Not DIY-friendly (hire professional)
- Need minimum area (3+ square metres) for trades to quote
- Get 3 quotes (prices vary significantly)
- Specify light-coloured aggregate (cooler underfoot)
Gravel Patios
Ultra-budget option:
- Cheapest hard surface: $15-35 per square metre materials
- Very DIY-friendly
- Permeable (excellent drainage)
- Informal relaxed character
- Easily changed or expanded
Proper installation:
- Excavate 100mm depth
- Weed mat or geotextile fabric (prevents weeds)
- 20-30mm decorative gravel 75-100mm deep
- Steel or timber edge restraint (contains gravel)
- Compact lightly (plate compactor hire or hand tamper)
Limitations:
- Furniture less stable (needs paver pads under legs)
- Gravel migrates (requires occasional raking)
- Some find uncomfortable barefoot
- Informal aesthetic (doesn’t suit all properties)
- Leaf litter harder to clean
Best uses:
- Transitional spaces (stepping stone areas)
- Combined with pavers (gravel infill between paver zones)
- Budget staging (gravel first year, pave later)
- Informal cottage or coastal gardens
For creative uses of gravel in broader garden design including paths and planting beds, see our guide on gravel garden ideas for low-maintenance yards.
Simple Pergola Structures
Overhead cover defines outdoor rooms and provides essential shade for Melbourne and Peninsula summers.
Basic Timber Pergola
Budget approach:
- Treated pine posts and beams (hardwood quadruples cost)
- Simple design (4 posts, 2 beams, rafters)
- Minimal cutting and joinery
- DIY-friendly for basic carpentry skills
Material costs (3m x 3m basic pergola):
- 4x 100x100mm treated pine posts (3m): $160-240
- 2x 190x45mm treated pine beams (3m): $80-120
- 8x 90x45mm rafters (3m): $120-160
- Galvanised brackets and fixings: $80-120
- Post stirrups or concrete: $60-100
- Stain or oil finish: $60-80
- Total materials: $560-820
Construction priorities:
- Structural integrity first (don’t compromise posts or beams)
- Finish details optional (can add trim later)
- Posts can be stained/painted over time
- Rafters provide enough shade initially (add roofing later if desired)
Roofing options (staged approach):
- Year 1: Open rafters only (partial shade, cheapest)
- Year 2: Add shade cloth ($150-300, removable)
- Year 3: Polycarbonate sheeting ($400-800, permanent weather protection)
- Year 4: Upgrade to Colorbond or insulated panels if budget allows
Shade Sails
When they work better:
- Very tight budgets ($200-600 complete)
- Rental properties (removable)
- Modern architecture (contemporary look)
- Temporary solution (planning future permanent structure)
- Instant coverage (no construction time)
Cost and installation:
- Quality shade sail: $150-400 (size dependent)
- Mounting posts or wall brackets: $50-200
- DIY installation: straightforward
- Professional installation: $200-400 labour if required
Limitations:
- Less “room” feeling than pergola
- Wind sensitive (noisy in Peninsula coastal wind)
- 7-10 year lifespan (fabric replacement needed)
- Can’t add roofing (shade only, not weather protection)
Repurposed and Recycled Materials
Creative sourcing dramatically reduces material costs.
Reclaimed Timber
Sources:
- Demolition yards (Melbourne and Mornington area)
- Gumtree, Facebook Marketplace (free or cheap)
- Council hard rubbish collection (check local dates)
- Old fencing or decking from your property
- Builders’ off-cuts (building sites with permission)
Uses:
- Furniture frames (benches, tables, planter boxes)
- Privacy screens (vertical battens)
- Pergola details (not structural)
- Garden edging
- Feature walls
Safety considerations:
- Avoid treated timber for food contact or fire pits
- Check for rot, termite damage, structural soundness
- Remove nails and hardware (safety, appearance)
- Sand splinters (hand sanding acceptable, orbital sander faster)
Second-Hand Pavers and Bricks
Where to find:
- Demolition sites (sometimes free if you collect)
- Classifieds (people renovating often give away old pavers)
- Reclaimed building materials suppliers
- Council depots (occasionally available)
Considerations:
- Quality varies (inspect before collecting)
- Often mismatched (creates rustic character, not formal look)
- Usually need cleaning (pressure washer hire)
- May need levelling compound or extra base work
- Works better informal cottage gardens than modern designs
IBC Tanks for Raised Beds
Innovative budget planter:
- 1000L IBC tanks: $50-100 second-hand
- Cut in half creates 2 large raised beds
- Line with pond liner
- Fill with quality soil
- Frame with timber or leave industrial character
Advantages:
- Huge volume (excellent for vegetables, feature planting)
- Instant height (raised bed without expensive sleeper wall)
- Mobile (can relocate if planning patio changes)
- Modern industrial aesthetic suits contemporary spaces
For broader outdoor living design ideas including furniture arrangement and zone planning, see our guide on outdoor living ideas for Peninsula climate.
Staging Construction
Spreading work across multiple years manages cash flow whilst building toward complete vision.
Year 1: Foundation Essentials
Priority spending:
- Level paved area (minimum 3m x 3m for table and chairs)
- Basic shade structure (simple pergola or shade sail)
- Outdoor lighting (safety and evening use)
- Seating (can be simple bench or second-hand furniture initially)
Budget allocation:
- Paving: $600-1,500 (DIY pavers or concrete pour)
- Shade: $300-800 (basic pergola materials or quality shade sail)
- Lighting: $100-300 (solar path lights and string lights)
- Seating: $100-500 (budget or second-hand)
- Year 1 total: $1,100-3,100
Result: Functional outdoor room for entertaining and relaxation. Not polished, but completely usable. Establishes footprint for future refinements.
Year 2: Comfort and Refinement
Second-year additions:
- Better outdoor furniture (upgrade initial budget pieces)
- Planting around patio edges (soften hard surfaces)
- Privacy screens if needed (batten screens or planting)
- Outdoor storage (deck box for cushions, tools)
- Fire pit or portable outdoor heater (extend season)
Budget allocation:
- Furniture upgrade: $500-1,500
- Planting: $200-600
- Privacy elements: $200-800
- Storage: $100-300
- Heating: $150-500
- Year 2 total: $1,150-3,700
Year 3: Finishing Details
Polishing touches:
- Pergola roofing (polycarbonate or Colorbond)
- Permanent lighting (wired LED downlights)
- Built-in elements (planter boxes, bench seating)
- Outdoor kitchen prep (if desired)
- Decorative elements (water feature, artwork)
Budget allocation:
- Roofing: $400-1,500
- Permanent lighting: $300-1,000 (electrician)
- Built-ins: $300-1,000
- Kitchen prep: $500-2,000
- Decorative: $200-800
- Year 3 total: $1,700-6,300
Three-year total: $3,950-13,100 (vs $15,000-30,000 single-phase professional installation)
Smart Budget Priorities
Focusing limited funds on high-value elements maximises enjoyment per dollar spent.
Invest in Foundations
Where not to cut corners:
- Base preparation (poor bases sink and crack)
- Structural posts and beams (safety and longevity)
- Drainage (prevents water pooling and damage)
- Quality fixings (galvanised screws and brackets outlast cheap alternatives)
False economies:
- Skipping base rock (pavers sink, crack)
- Undersized pergola posts (structural failure risk)
- Cheap fixings (rust, fail prematurely)
- Poor drainage (water damage, mosquitos)
Save on Aesthetics
Where you can economise:
- Finish quality (stain later, accept weathered look initially)
- Furniture (upgrade over time, start budget)
- Decorative elements (add gradually)
- Landscaping (plant progressively, starts grow)
- Complex details (keep design simple initially)
Smart compromises:
- Treated pine today, stain and upgrade furniture tomorrow
- Basic furniture covered with throws (change appearance affordably)
- Simple planting plan (fewer larger plants, not many small)
- String lights initially (upgrade to permanent fixtures later)
DIY Where Possible
Realistic DIY projects:
- Paver laying (straightforward with research and care)
- Basic pergola construction (carpentry skills required)
- Planting and soft landscaping
- Painting and staining
- Simple furniture assembly or building
- String lighting installation (outdoor-rated products)
When to hire:
- Electrical wiring (licensed electrician required)
- Concrete pours (professional efficiency worth cost)
- Complex carpentry (pergola engineering, stairs)
- Heavy excavation (machinery hire often cheaper than manual labour)
- Anything beyond skill level (poor DIY costs more to fix)
For comparison of DIY capabilities versus professional requirements in related landscape projects, see our guide on building retaining walls DIY vs professional limits.
Affordable Styling
Creating attractive spaces without expensive furnishings or decor.
Budget Furniture Solutions
Op shops and second-hand:
- Timber outdoor settings (sand and oil to restore)
- Wrought iron (wire brush rust, repaint)
- Wicker and rattan (cushions update appearance)
- Individual pieces (mix-and-match character)
Budget retailers:
- Kmart and Target outdoor ranges (seasonal sales)
- IKEA outdoor furniture (good quality-to-price)
- End-of-season clearances (February-March)
- Bunnings budget outdoor settings
DIY furniture:
- Pallet furniture (sand, stain, cushions)
- Sleeper benches (simple, rustic)
- Concrete block and timber plank benches
- Tree stump stools (chainsaw, sand, seal)
Lighting on a Budget
Solar path lights:
- $5-15 each (Bunnings, Kmart)
- No wiring required
- Line paths and define zones
- Replace batteries every 2-3 years
String lights:
- $20-80 (length and quality dependent)
- Festoon or fairy lights
- Plug-in or solar options
- Creates ambience affordably
- Outdoor-rated essential (IP44+ Melbourne weather)
DIY lanterns:
- Solar lanterns: $10-30 each
- Candles in glass jars (wind protection)
- Tea lights in paper bags (disposable path lighting)
- Citronella candles (lighting plus insect deterrent)
Planting Strategy
Budget landscaping:
- Start with fewer larger plants (instant impact)
- Grow from cuttings (free propagation)
- Swap plants with friends and neighbours
- Native plants (cheaper, lower maintenance, suited to climate)
- Mulch heavily (reduces plant density needed)
Container gardens:
- Use budget pots or paint old ones
- Group containers (more impact than scattering)
- Grow herbs (practical and attractive)
- Seasonal colour changes (annuals in pots)
Peninsula and Melbourne Considerations
Regional climate and soil affect budget decisions.
Wind Protection
Peninsula coastal wind:
- Privacy screens double as windbreaks
- Essential for comfortable outdoor spaces
- Lattice, battens, or shade cloth
- Plant hedges (slower but free long-term)
- Consider prevailing wind direction (summer north-east, winter west)
Budget wind solutions:
- Shade cloth attached to posts ($50-150)
- Lattice panels ($30-80 each Bunnings)
- Bamboo screening ($40-100 per roll)
- Fast-growing shrubs (Coastal rosemary, Westringia)
Clay Soil Drainage
Managing clay blocks:
- Ensure patio grading falls away from house
- Ag pipe under paved areas if water collects
- Raised beds avoid clay altogether
- Improve soil with gypsum and organic matter (gradual)
Budget drainage:
- DIY ag pipe: $8-15 per metre
- Gravel fill: $40-60 per tonne
- Proper grading during excavation (no extra cost if done right initially)
- Surface drains to garden beds or stormwater
For comprehensive guidance on managing clay soil drainage for Peninsula properties, see our guide on garden drainage fixes for wet Victorian yards.
Seasonal Construction
Best times for DIY patio projects:
- Spring and autumn (comfortable working weather)
- Summer paving (concrete and grout cure faster)
- Winter planning and material sourcing
- Avoid winter concreting (frost and rain delays)
Final Thoughts
Creating functional, attractive outdoor patios on modest budgets demands smart material choices, realistic DIY assessment, and willingness to stage construction over multiple years rather than expecting instant completion. Melbourne and Peninsula homeowners achieve comfortable outdoor living spaces for $2,000-5,000 initially, with gradual refinements building toward complete vision as budgets allow.
Budget priorities:
- Invest in foundations and structure (base preparation, posts, beams)
- Start with essentials (paved area, basic shade, simple seating)
- Save on aesthetics and finishes (upgrade furniture and decorative elements over time)
- Stage construction across 2-3 years (spreads costs, allows learning and adjustment)
Best value approaches:
- DIY concrete pavers (affordable, durable, achievable)
- Simple timber pergola (treated pine, basic design)
- Staged construction (functional Year 1, refined Year 2-3)
- Repurposed materials where appropriate (furniture, decorative elements)
- Smart shopping (second-hand, seasonal sales, classifieds)
Cost comparison:
- DIY budget patio (20 square metres, basic pergola): $2,000-5,000 total over 3 years
- Professional budget installation: $8,000-15,000
- Professional premium installation: $15,000-30,000+
- Savings from DIY and staging: $6,000-25,000
Staging timeline:
- Year 1: Paved area, basic shade, simple seating ($1,100-3,100)
- Year 2: Furniture upgrade, planting, privacy ($1,150-3,700)
- Year 3: Roofing, permanent lighting, built-ins ($1,700-6,300)
DIY-appropriate elements:
- Paver laying (research and care required)
- Basic pergola construction (carpentry skills)
- Planting and landscaping
- Furniture restoration and assembly
- Solar and string lighting installation
Professional recommended:
- Electrical wiring (legal requirement)
- Concrete pours (efficiency worthwhile)
- Complex pergola designs (engineering)
- Heavy excavation (machinery access)
Budget patios deliver the same essential benefits as expensive installations: defined outdoor zones, weather protection, comfortable surfaces for furniture, and extended living spaces for Australian entertaining and relaxation. Smart spending and staged construction simply spreads costs over time whilst building equity through DIY labour, creating outdoor rooms that enhance property value and lifestyle without financial stress or overextension.
Need a Hand?
Professional lawn and garden services when you need them. Get a quote from our trusted Peninsula partners.
Contact Mowing Magic or Peninsula Hard Yards →Disclosure: We share links to related local services that serve our readers in the Peninsula area.