How to Build a Small Retaining Wall (DIY Limits)
Honest guide to DIY retaining wall limits. When small walls (under 600mm) are safe DIY projects, when engineering and professional builders become essential, drainage requirements, and avoiding costly mistakes.
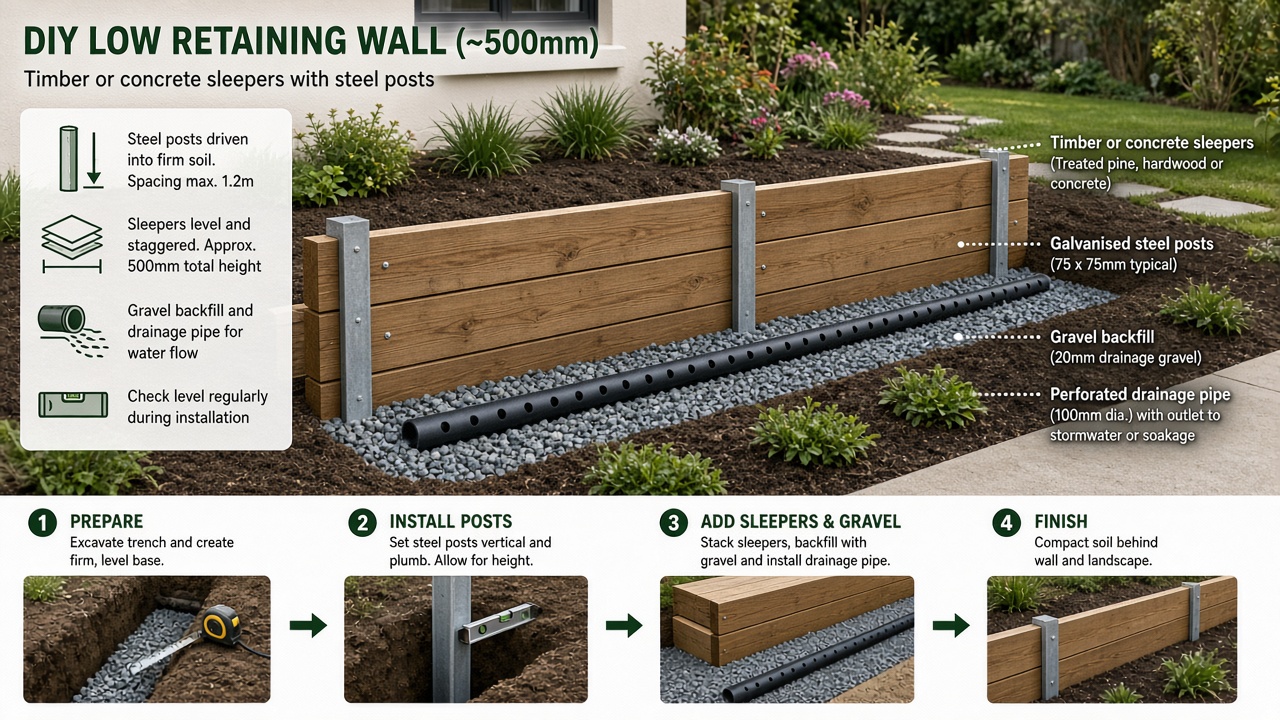
DIY retaining wall projects tempt homeowners: perceived cost savings, satisfaction of building landscape structures yourself, and countless online tutorials suggesting retaining walls are straightforward weekend projects. Yet retaining walls fail—spectacularly and expensively—when DIY builders underestimate structural loads, drainage requirements, or their own skill limitations.
Understanding the genuine DIY limits for retaining walls prevents expensive failures whilst identifying safe, manageable projects suited to capable homeowners. The critical threshold: walls under 600mm height on stable ground with proper drainage can be reasonable DIY projects for experienced builders. Anything beyond this threshold risks structural failure, property damage, and costly professional repairs exceeding the original “savings.”
Honest assessment of DIY suitability, material requirements, and drainage essentials determines whether you should tackle a retaining wall project yourself or engage professionals from the start.
The 600mm Rule
Height determines DIY suitability and engineering requirements.
Why 600mm Matters
Structural loads increase exponentially:
- Soil behind walls exerts lateral pressure
- Pressure increases dramatically with height
- 300mm wall: manageable load
- 600mm wall: significant load, manageable with proper construction
- 900mm+ wall: engineering-level loads requiring professional design
Building and engineering regulations:
- Most councils require engineering for walls over 600mm
- Within 1.5x height of boundary: engineering typically required regardless of height
- Supporting structures or surcharge loads: engineering required
- Insurance implications: DIY walls collapsing may not be covered
Failure consequences:
- Low walls (under 600mm): manageable repair if fails
- High walls (over 600mm): collapse expensive, dangerous, potentially property-damaging
- Neighbouring properties affected by failures
- Liability exposure significant
Safe DIY Height Range
Under 400mm:
- Low-risk DIY project
- Manageable loads even with moderate drainage
- Failure consequences minor
- Garden bed edging rather than structural retaining
- Materials choice flexible
400-600mm:
- Upper limit for experienced DIY
- Requires proper drainage (non-negotiable)
- Material choice matters (sleepers, blocks designed for retaining)
- Careful construction essential
- Consider professional advice even if DIY construction
Over 600mm:
- Not suitable DIY project
- Engineering required (most jurisdictions)
- Professional construction recommended
- Liability risk too high
- Failure consequences expensive
Over 1000mm:
- Always requires engineering
- Always requires professional construction
- Often requires council permits
- Structural complexity beyond DIY capability
- Don’t consider DIY regardless of skills
When DIY Retaining Walls Are Appropriate
Specific conditions determine DIY suitability.
Suitable DIY Scenarios
Low garden bed edging (under 400mm):
- Raised garden beds
- Terracing gentle slopes
- Defining lawn from garden areas
- Minimal structural load
- Failure consequences minor (replace, no danger)
Stable soil conditions:
- Compacted clay or sandy loam
- Not loose sand or fill
- Not waterlogged ground
- Not sloping site above wall (additional surcharge)
- Residential suburban blocks generally suitable
Straight or simple designs:
- Straight wall runs
- Simple corners (90-degree)
- Avoid curves (complex construction)
- Avoid complex stepped designs
- Keep it simple reduces failure risk
Accessible sites:
- Vehicle access for materials delivery
- Flat working area
- Space for excavation and drainage installation
- No overhead powerlines or underground services
- Safe working conditions
Appropriate materials:
- Treated pine sleepers (H4/H5)
- Concrete sleepers
- Interlocking concrete blocks (designed for retaining)
- Not stacked bricks (unstable without engineering)
- Not loose stones or “dry-stack” over 300mm
No surcharge loads:
- Level or gently sloping ground behind wall
- No structures, driveways, or heavy loads above wall
- Garden beds or lawn only
- No water tanks, sheds, or vehicles
- Minimal load simplifies construction
Unsuitable DIY Scenarios
Avoid DIY when:
Wall height exceeds 600mm:
- Engineering required (legal requirement most councils)
- Structural loads too significant
- Failure consequences too expensive
- Professional construction safeguards investment
Near boundary fences:
- Within 1.5-3x wall height of boundary typically requires engineering
- Failure affects neighbour’s property
- Liability significant
- Council approval likely required
Unstable or unknown soil:
- Loose fill or sand
- Soft clay (Peninsula coastal areas sometimes problematic)
- Recent fill (not compacted properly)
- Unknown soil composition
- Waterlogged areas
Complex designs:
- Curved walls (require engineering)
- Large corner angles or multiple corners
- Stepped walls or multiple tiers
- Retaining walls with integrated seating/planters
- Complex drainage situations
Supporting structures:
- Retaining walls below driveways
- Supporting sheds, tanks, or structures
- Near footings of buildings
- Below pools or heavy landscaping
- Engineering non-negotiable
Steep slopes:
- Ground rising steeply behind wall
- Surcharge loads from slope significant
- Drainage complex
- Failure risk high
- Professional assessment essential
Commercial properties or rental properties:
- Liability too high
- Professional construction maintains insurance coverage
- Tenants may claim for DIY failures
- Penny-wise, pound-foolish
Material Options for DIY Walls
Choose materials suited to your skills and wall application.
Treated Pine Sleepers
Characteristics:
- 200x75mm or 200x100mm common sizes
- H4 or H5 treatment (ground contact)
- Relatively lightweight (manageable for two people)
- Easy to cut (chainsaw or circular saw)
- Moderate cost ($25-45 per sleeper)
Best for:
- Under 600mm walls
- Cottage or informal garden aesthetic
- Experienced DIY builders
- Budget-conscious projects
- Bush or natural settings
DIY suitability: Good
- Manageable weight
- Easy to work with
- Forgiving of minor errors
- Suitable power tools available
- No specialised equipment needed
Limitations:
- 10-15 year lifespan (Melbourne conditions)
- Termite risk (requires annual inspection)
- Rot in poor drainage conditions
- Not permanent solution
- Replacement eventually needed
Installation key points:
- Vertical steel posts (40mm star pickets or H-beams) every 1-2 metres
- Horizontal sleepers stacked
- Drill through sleepers, bolt to posts
- Adequate drainage behind wall essential
- Backfill with gravel, install ag pipe
For detailed timber sleeper considerations, see our guide on timber sleeper retaining walls.
Concrete Sleepers
Characteristics:
- 200x75mm or 200x100mm typical
- Concrete (steel-reinforced)
- Heavy (40-60kg per sleeper)
- Long lifespan (40-60+ years)
- Moderate cost ($35-65 per sleeper)
Best for:
- Under 600mm walls (DIY limit)
- Permanent solutions
- Formal or contemporary gardens
- Properties with termite concerns
- Low-maintenance preference
DIY suitability: Moderate
- Heavy (two strong people required)
- Needs steel posts (same as timber)
- Cutting difficult (angle grinder with concrete blade)
- Less forgiving of errors
- Manageable with proper equipment
Advantages over timber:
- 40-60+ year lifespan
- No termite concerns
- No rot or decay
- Minimal maintenance
- Better long-term value
Installation similar to timber:
- Steel posts every 1-2 metres
- Stack horizontally
- Drill and bolt to posts (masonry drill bits required)
- Drainage critical (same as timber)
- Heavier excavation and backfill work
For comprehensive concrete sleeper information, see our guide on concrete sleeper retaining walls.
Interlocking Concrete Blocks
Characteristics:
- Specific retaining wall block systems (Besser, Keystone, others)
- Designed to lock together
- Hollow core (fill with gravel or concrete)
- Moderate weight per block (15-30kg)
- Moderate cost ($8-15 per block)
Best for:
- Under 600mm walls (certain systems rated to 1m DIY)
- Straight or curved walls
- Terraced gardens
- Multiple-tier low walls
- Contemporary aesthetic
DIY suitability: Good (if following system instructions)
- Designed for DIY installation
- Manufacturer instructions provided
- No mortar required (dry-stack with pins/interlocking)
- Base preparation critical
- Drainage via hollow cores
Installation key points:
- Compacted gravel base (essential)
- First course buried or on concrete footing
- Stack courses with interlock
- Fill cores with gravel (drainage)
- Backfill with free-draining material
- Follow manufacturer’s specifications exactly
Limitations:
- Specific aesthetic (not natural stone look)
- Heavier than timber (multiple trips for materials)
- Cutting blocks difficult (requires concrete saw)
- Cheaper systems less reliable (use reputable brands)
Not Suitable for DIY
Avoid these materials without professional help:
Stacked bricks or besser blocks (without engineering):
- Unstable above 300mm without mortar/engineering
- Require proper footings
- Mortar skills essential
- Failure risk high
- Not designed for lateral loads
Natural stone (stacked or “dry-stack”):
- Requires skill to achieve stable structure
- Above 400mm needs significant experience
- Heavy material (difficult for DIYers)
- Proper footings essential
- Better left to stonemasons
Gabion walls (rock-filled cages):
- Require professional installation above 600mm
- Structural engineering for proper design
- Heavy materials and equipment needed
- Footing requirements complex
- Not truly DIY-friendly
Railway sleepers (non-treated):
- Often contaminated (creosote, chemicals)
- Health risks
- Variable dimensions (installation difficult)
- Heavy, difficult to work with
- Treated sleepers safer choice
Drainage: The Non-Negotiable Requirement
Poor drainage causes majority of retaining wall failures.
Why Drainage Matters
Water pressure destroys walls:
- Soil behind wall saturated with water = massive lateral pressure
- Pressure dramatically exceeds design loads
- Walls bow, crack, collapse
- Even well-built walls fail without drainage
- Melbourne’s winter rainfall accumulates behind walls
Hydrostatic pressure:
- Water doesn’t compress (incompressible)
- Builds enormous force against wall
- Clay soils (common Peninsula) hold water longer
- Single heavy rain event can cause failure
- Ag pipe and gravel backfill essential
Essential Drainage Components
Agricultural pipe (ag pipe):
- 100mm slotted or perforated pipe
- Placed at base of wall behind sleepers/blocks
- Collects groundwater
- Directs water to outlet (stormwater, garden drainage point)
- Non-negotiable for any retaining wall
Gravel backfill:
- 300mm minimum gravel zone behind wall
- Free-draining aggregate (not soil)
- Allows water to drain to ag pipe
- Reduces pressure on wall
- Critical for wall longevity
Weep holes:
- Through wall at base
- Every 1-2 metres along wall
- Allows water to drain through wall (not only via ag pipe)
- Simple but essential
- Prevents pressure build-up
Geotextile fabric:
- Separates soil from gravel
- Prevents soil clogging gravel and ag pipe
- Wrapped around gravel zone
- Extends ag pipe functionality
- Low cost, high value
Surface drainage:
- Grade soil away from top of wall
- Prevents surface water running into wall
- Simple swale or slope directing water away
- Often overlooked but important
- Reduces water volume wall must handle
Drainage Installation Steps
Step 1: Excavate:
- Dig trench for wall foundation
- Excavate 300mm+ behind wall footprint (gravel zone)
- Depth to accommodate base + ag pipe
- Width: wall width + 300mm minimum behind
Step 2: Foundation:
- Compacted gravel base (100-150mm)
- Level and solid
- Provides stable footing for wall
- Critical for long-term stability
Step 3: Ag pipe placement:
- Lay ag pipe along base behind wall position
- Slope pipe slightly to outlet (1:100 minimum)
- Outlet to stormwater, garden bed, or suitable drainage point
- Ensure pipe actually drains (test with water)
Step 4: Build wall:
- Construct wall (sleepers, blocks, as per material method)
- Leave weep holes at base (every 1-2m)
- Ensure drainage through wall possible
Step 5: Backfill drainage zone:
- Place geotextile fabric against soil (behind gravel zone)
- Fill 300mm zone with free-draining gravel
- Surround ag pipe with gravel
- Wrap geotextile over gravel (prevents soil contamination)
Step 6: Backfill soil:
- Behind gravel zone, backfill with excavated soil
- Compact in layers (prevent settlement)
- Grade away from wall at top
- Mulch or plant to stabilise
Cost of drainage (materials for 10m wall):
- Ag pipe (10m): $50-80
- Gravel (2-3 cubic metres): $150-300
- Geotextile fabric: $30-60
- Total: $230-440
- Skipping drainage to save $300 risks $5,000-15,000+ wall failure
For comprehensive drainage guidance, see our article on garden drainage fixes for wet Victorian yards.
Step-by-Step DIY Retaining Wall (Small Sleeper Wall)
Example: 6-metre long, 450mm high treated pine sleeper wall.
Tools and Materials Required
Tools:
- Spade, mattock, wheelbarrow (excavation)
- String line and level (setting out)
- Post-hole digger or crowbar (for steel posts)
- Drill with long drill bits (drilling sleepers/posts)
- Spanners or socket set (bolting)
- Chainsaw or circular saw (cutting sleepers)
- Tape measure, pencil, carpenter’s square
Materials:
- 18x treated pine sleepers 200x75mm x 2.4m (3 high x 6m long)
- 4x steel posts (40mm star pickets or 100x50mm H-beams) - every 1.5-2m
- Galvanised coach bolts (M12 or M16, 200mm+ long) - 2 per sleeper per post
- Washers and nuts for bolts
- 100mm ag pipe (6m length)
- Gravel (1.5-2 cubic metres)
- Geotextile fabric (10m x 1m)
Cost estimate (materials):
- Sleepers: $25 x 18 = $450
- Steel posts: $25 x 4 = $100
- Bolts/fixings: $80
- Ag pipe: $50
- Gravel: $200
- Geotextile: $40
- Total: ~$920 materials
(Professional installation: $2,500-4,000 for same wall)
Construction Steps
Step 1: Mark out wall line:
- Use string line to mark wall position
- Ensure straight (or mark curve if applicable)
- Check levels across site
- Measure twice before excavation
Step 2: Excavate:
- Dig trench 200mm deep, 400mm wide (base for sleepers)
- Excavate 300-400mm behind wall line (drainage zone)
- Remove grass, roots, soft soil
- Create level base (check with spirit level)
Step 3: Install steel posts:
- Every 1.5-2 metres along wall line
- Drive star pickets 600mm into ground (sledgehammer)
- OR dig holes for H-beam posts, set in concrete
- Posts must be plumb (vertical)
- These provide structural strength
Step 4: Compact base:
- Add 100mm gravel to trench
- Compact firmly (hand tamper or plate compactor)
- Check level across length
- Provides stable foundation
Step 5: Lay first sleeper course:
- Place bottom sleepers on compacted base
- Drill through sleepers and into/through steel posts
- Bolt sleepers to posts (coach bolts, washers, nuts)
- Tighten securely
- Ensure level along length
Step 6: Lay ag pipe:
- Place ag pipe behind first course of sleepers
- Along entire length
- Slight slope to outlet point (1:100)
- Test drainage with water
Step 7: Stack remaining courses:
- Place second sleeper course on first
- Stagger joints (don’t align vertically)
- Drill and bolt to posts
- Repeat for third course
- Leave weep holes at base (don’t fill gaps between bottom sleepers completely)
Step 8: Install drainage:
- Place geotextile against soil behind wall
- Fill 300mm zone with gravel (around ag pipe)
- Wrap geotextile over gravel
- This creates drainage zone
Step 9: Backfill:
- Behind gravel zone, backfill with soil
- Compact in layers (every 150-200mm)
- Prevents settlement
- Grade away from wall at top
Step 10: Finish:
- Trim any protruding bolts (angle grinder)
- Mulch or plant garden bed
- Test drainage (water at top, check outlet)
- Allow settlement (few weeks) before heavy planting
Time Required
Experienced DIY builder (with helper):
- Day 1: Excavation and base preparation (6-8 hours)
- Day 2: Post installation and first course (4-6 hours)
- Day 3: Remaining courses, drainage, backfill (6-8 hours)
- Total: 2-3 full days (two people)
First-time DIY builder:
- Add 50-100% more time
- Learning curve significant
- Mistakes require rework
- 4-5 days realistic
Common DIY Mistakes
Avoid these frequent errors.
Inadequate Drainage
Mistake:
- Skipping ag pipe and gravel backfill
- “Soil drains fine” assumption
- Cost-cutting on drainage materials
Consequence:
- Wall failure within 1-5 years
- Bowing, cracking, collapse
- Water pressure overwhelming
Prevention:
- Always install ag pipe and gravel zone
- Never skip drainage components
- Test drainage actually works (pour water, check outlet)
Poor Base Preparation
Mistake:
- Building on soft soil or grass
- Inadequate compaction
- No gravel base
Consequence:
- Settlement over time
- Wall tilts forward or sinks
- Structural failure
Prevention:
- Remove all soft material
- Compact gravel base firmly
- Don’t rush foundation work
Insufficient Post Strength or Spacing
Mistake:
- Posts too small (25mm star pickets inadequate)
- Posts too far apart (over 2m spacing)
- Not driven deep enough (minimum 600mm)
Consequence:
- Wall lacks lateral strength
- Bows outward under pressure
- Posts bend or pull out
Prevention:
- Use 40mm+ star pickets or 100x50mm+ H-beams
- Maximum 2m spacing (1.5m safer)
- Drive posts 600mm+ into ground
Building Too High
Mistake:
- “Just another course” mentality
- 800-1000mm wall without engineering
- Overconfidence in DIY capability
Consequence:
- Structural loads exceed DIY design
- Wall failure likely
- Expensive professional rebuild
- Potential property damage or injury
Prevention:
- Respect 600mm DIY limit
- Engage engineer/professional for higher walls
- Don’t risk expensive failure
Wrong Materials
Mistake:
- Untreated or H3 timber (inadequate for ground contact)
- Stacked bricks without engineering
- Railway sleepers (contaminated, variable)
Consequence:
- Premature material failure
- Structural instability
- Health risks (contaminated materials)
Prevention:
- Use H4/H5 treated sleepers minimum
- Concrete sleepers for permanent solution
- Proper retaining wall materials only
Ignoring Building Regulations
Mistake:
- Building without checking council requirements
- Assuming walls under 1m don’t need permits
- Ignoring boundary setback rules
Consequence:
- Council enforcement orders (remove wall)
- Fines
- Insurance issues if wall fails
- Liability for neighbour’s property damage
Prevention:
- Check council regulations before starting
- Engage engineer for walls over 600mm or near boundaries
- Get permits where required
When to Engage Professionals
Recognise limits of DIY capability.
Always Hire Professional For:
Walls over 600mm height:
- Engineering required
- Structural complexity beyond DIY
- Liability risk too high
- Professional design and construction essential
Walls near boundaries:
- Within 1.5x wall height of fence line
- Engineering typically required
- Neighbour relations important
- Council approval likely needed
Walls supporting loads:
- Below driveways, sheds, structures
- Surcharge loads significant
- Engineering non-negotiable
- Professional construction safeguards investment
Complex designs:
- Curved walls
- Multiple tiers or stepped walls
- Integrated seating, planters
- Architectural features
Problem soils:
- Soft clay or loose sand
- Fill material (unknown compaction)
- Waterlogged areas
- Reactive soils
Large projects:
- Over 10-15 linear metres
- Multiple walls across property
- Major earthworks required
- Equipment needs (excavator, compactor)
Professional Costs (Melbourne/Peninsula)
Design and engineering:
- Engineer design/certification: $800-2,500
- Required for walls over 600mm typically
- Provides structural confidence
- Protects liability
Construction:
- Sleeper walls (600mm): $250-400 per linear metre installed
- Concrete sleeper walls: $300-500 per linear metre
- Concrete block walls: $350-600+ per linear metre
- Natural stone: $500-1,000+ per linear metre
Value of professional construction:
- Proper structural design
- Quality drainage installation
- Council compliance
- Insurance coverage maintained
- Warranty on workmanship
- Saves expensive DIY failure repairs
For broader retaining wall options and professional solutions, see our guide on retaining wall ideas for Australian properties.
Final Thoughts
DIY retaining walls are viable projects for capable homeowners when realistic about height limits, material selection, and drainage requirements. Walls under 600mm on stable ground, using appropriate materials (treated/concrete sleepers or interlocking blocks), with proper drainage installed, can be manageable weekend projects saving $1,500-3,000 over professional construction.
Safe DIY retaining wall parameters:
- Height: Under 600mm maximum (under 400mm ideal)
- Soil: Stable suburban clay or loam (not fill or loose sand)
- Design: Straight walls or simple corners
- Materials: H4/H5 treated sleepers, concrete sleepers, or interlocking blocks
- Drainage: Ag pipe, gravel backfill, weep holes (non-negotiable)
- Posts: 40mm+ star pickets or H-beams every 1.5-2m
- Location: Not near boundaries, not supporting structures
When professional construction essential:
- Walls over 600mm height
- Near boundary fences
- Supporting surcharge loads
- Complex designs or curves
- Problem soils or slopes
- Commercial or rental properties
Drainage reality: Every retaining wall needs proper drainage—ag pipe, gravel backfill, weep holes. Skipping drainage to save $300 risks $5,000-15,000+ wall failure. Never negotiate on drainage components regardless of wall height or materials.
Cost comparison (6m x 450mm wall example):
- DIY materials: $900-1,200
- Professional construction: $2,500-4,000
- DIY savings: $1,600-2,800 (if successful)
- DIY failure rebuild: $3,000-8,000+
Risk assessment: Low walls (under 400mm) present minimal risk—failure annoying but not expensive. Walls 400-600mm require careful construction and proper drainage, but failure still manageable. Walls over 600mm carry high failure risk with expensive consequences—false economy attempting DIY.
Time investment: Experienced DIY builders can complete small retaining wall projects in 2-3 full days (with helper). First-time builders should expect 4-5 days including learning curve, material acquisition, and inevitable problem-solving.
Skills required:
- Capable with power tools (drill, saw)
- Understanding of levels and straight lines
- Ability to dig, lift heavy materials (25-60kg sleepers/blocks)
- Problem-solving when site conditions vary from plans
- Realistic self-assessment of capabilities
Peninsula-specific considerations:
- Clay soils common (drainage extra critical)
- Coastal properties may face salt exposure (consider materials)
- Sloped blocks prevalent (professional advice valuable)
- Established vegetation root systems (excavation challenges)
Final recommendation: If your proposed retaining wall fits safe DIY parameters (under 600mm, stable soil, straight design, appropriate materials) and you’re capable DIY builder comfortable with physical work and power tools, DIY construction can save meaningful money whilst delivering functional results. However, if wall exceeds 600mm, involves complex design, sits on boundary, or supports loads, engage professionals from the start—attempting DIY on unsuitable projects creates expensive failures costing more than professional construction would have originally.
The honest DIY limit is lower than most homeowners estimate. Respecting that limit protects your property, your budget, and your safety whilst allowing genuine cost savings on appropriate small retaining wall projects where DIY skills can successfully deliver lasting results.
Need a Hand?
Professional lawn and garden services when you need them. Get a quote from our trusted Peninsula partners.
Contact Mowing Magic or Peninsula Hard Yards →Disclosure: We share links to related local services that serve our readers in the Peninsula area.