Retaining Wall Drainage: Stop Blowouts
Understand why retaining walls fail from water pressure and how proper drainage prevents blowouts. Learn essential ag pipe installation, weep holes, gravel backfill techniques, and costly mistakes to avoid for long-lasting retaining walls.
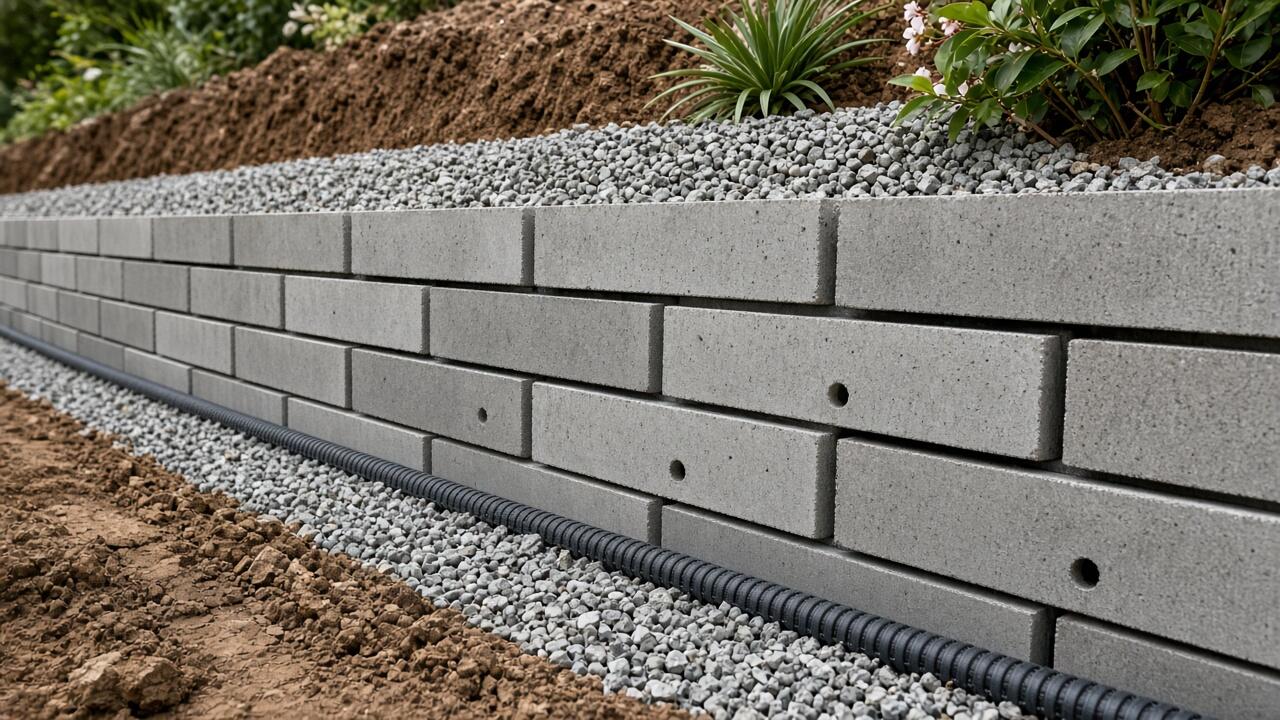
Retaining wall failures across Melbourne and Peninsula properties share one dominant cause: inadequate drainage allowing water pressure to build behind walls until structural capacity overwhelms and walls bow, crack, or collapse entirely. Regardless of wall material—timber sleepers, concrete, stone, or modern alternatives—drainage determines long-term survival more than material quality or construction technique.
Water accumulates behind retaining walls from rainfall infiltration, groundwater seepage, and irrigation runoff. This saturated soil weighs significantly more than dry soil and exerts tremendous lateral pressure against wall faces. Without proper drainage systems to channel water away, even well-constructed walls eventually fail under hydrostatic forces they were never designed to resist.
Understanding essential drainage components—agricultural pipe at wall base, adequate gravel backfill zones, weep holes through wall faces, and surface water diversion—prevents expensive failures whilst costing relatively little during initial construction. Skimping on drainage represents false economy that transforms affordable wall projects into expensive reconstruction after preventable blowouts destroy inadequate installations.
Why Retaining Walls Fail
Most retaining wall failures trace to water-related issues rather than structural inadequacy.
Hydrostatic Pressure
What it is:
- Water accumulation behind wall creates pressure
- Saturated soil weighs significantly more than dry soil
- Pressure increases with water depth
- Acts horizontally against wall face
- Enormous force even in modest walls
Force magnitudes:
- Dry soil pressure: relatively manageable
- Saturated soil pressure: 2-3x dry soil pressure
- Standing water behind wall: extreme pressure
- Height matters: 1m wall faces far more pressure than 0.5m wall
- Pressure accumulates at base (maximum at bottom of wall)
Why walls fail:
- Designed for dry soil load only
- Saturated soil exceeds design capacity
- Water pressure relentless (doesn’t “give up”)
- Structural failure inevitable without drainage
- Time to failure: months to years depending on severity
Failure modes:
- Bowing: wall leans outward under pressure
- Cracking: concrete or masonry breaks
- Tilting: entire wall rotates forward
- Collapse: catastrophic structural failure
- Soil blowout: wall separates from retained soil
Clay Soil Challenges
Peninsula and Melbourne clay:
- Heavy clay common in many Melbourne suburbs
- Clay holds water (doesn’t drain naturally)
- Expands when wet, shrinks when dry
- Exacerbates pressure problems
- Most problematic soil type for retaining walls
Clay-specific issues:
- Water doesn’t infiltrate through clay
- Accumulates behind wall
- Creates “bathtub” effect
- Seasonal expansion/contraction stresses walls
- Professional drainage essential in clay
Sandy soil advantage:
- Peninsula sandy soils drain naturally
- Lower water pressure risk
- Still requires drainage (insurance)
- Easier drainage installation (water moves freely)
- Natural advantage for retaining walls
Common Drainage Mistakes
No drainage at all:
- Most common and most serious mistake
- Wall doomed to eventual failure
- Matter of when, not if
- Expensive reconstruction inevitable
- False economy skipping drainage
Inadequate gravel zone:
- Thin gravel layer insufficient
- 300mm minimum gravel backfill required
- Narrow zone clogs quickly
- Acts more like soil than drainage
- Needs proper thickness to function
Blocked or missing ag pipe:
- Ag pipe installed but never outlets anywhere
- Crushed during backfilling
- Installed with holes facing up (silt clogs)
- No gravel surround (soil contact blocks holes)
- Pipe must outlet to lower ground or stormwater
Missing weep holes:
- Mortared or solid walls without weep holes trap water
- Creates full hydrostatic pressure
- Particularly critical for concrete and masonry walls
- Easy to forget during construction
- Essential backup drainage
Poor surface drainage:
- Water directed toward wall from upslope
- Irrigation runoff flows to wall
- Downpipes discharge at wall
- Surface water infiltrates behind wall
- Preventable with proper grading
For comprehensive guidance on wall height, construction methods, and when professional engineering required, see our guide on building retaining walls DIY vs professional limits.
Agricultural Pipe Installation
Ag pipe at wall base provides primary drainage for retaining walls.
What Agricultural Pipe Does
Function:
- Collects water accumulating behind wall
- Channels water away from wall base
- Reduces hydrostatic pressure to manageable levels
- Prevents water accumulation
- Critical drainage component
How it works:
- Slotted or perforated pipe laid at wall footing level
- Surrounded by free-draining gravel
- Water seeps through gravel into pipe slots
- Gravity carries water along pipe to outlet
- Continuous removal prevents pressure buildup
Why essential:
- Retaining walls without ag pipe fail prematurely
- Industry standard for walls over 400-600mm height
- Minimal cost relative to wall construction
- Insurance against hydrostatic failure
- Non-negotiable for proper wall construction
Ag Pipe Specifications
Pipe type:
- 100mm (4 inch) diameter typical residential walls
- 150mm diameter for high walls or clay soils
- Slotted ag pipe (slots, not perforations)
- Flexible corrugated for bending around corners
- UV-resistant if exposed at outlet
Pipe materials:
- PVC ag pipe: most common, durable, affordable
- Polyethylene: flexible, cold-resistant
- Avoid non-slotted stormwater pipe (doesn’t collect water)
- Geotextile sock optional (filters fines, can reduce flow)
- Check local supplier standard ag pipe suitable
Gravel surround:
- 100-150mm gravel below pipe
- 100-150mm gravel above and beside pipe
- Pipe fully encased in gravel (critical)
- Gravel allows water to reach pipe slots
- Without gravel surround, ag pipe ineffective
Gravel specification:
- 10-20mm blue metal or crushed rock
- Clean (no fines or sand)
- Free-draining aggregate
- Avoid pea gravel (too round, bridges poorly)
- Compacts somewhat whilst maintaining drainage
Installation Steps
Before wall construction:
- Excavate below wall footing level
- Lay 100-150mm compacted gravel base
- Position ag pipe on gravel base
- Ensure pipe gradient (minimum 1:100 fall)
- Test fall with water (before backfilling)
Pipe orientation:
- Slots facing DOWN or sideways (not up)
- Upward-facing slots clog with silt immediately
- Common mistake that destroys drainage effectiveness
- Sideways slots acceptable (some prefer)
- Downward slots optimal (less clog risk)
Pipe routing:
- Run parallel to wall full length
- Continue past wall ends (collect end zone water)
- Connect sections with couplings
- Maintain continuous fall to outlet
- Avoid high points (water traps)
Outlet location:
- Pipe must outlet somewhere useful
- Downslope daylight (natural ground)
- Stormwater connection (if available and permitted)
- Drainage easement or council drain
- Never terminate in dead end (defeats purpose)
Gravel encasement:
- Backfill around pipe with gravel
- Maintain 100-150mm clearance all sides
- Compact gravel gently (not aggressively)
- Continue gravel backfill up wall height (drainage zone)
- Geotextile fabric separates gravel from soil (prevents clogging)
During wall construction:
- Backfill drainage gravel as wall progresses
- Don’t crush pipe with heavy equipment
- Inspect pipe remains intact
- Flush pipe occasionally (check flow)
- Protect outlet from blockage
Outlet Details
Outlet visibility:
- Pipe should daylight visibly
- Allows inspection and maintenance
- Confirm water draining during rain
- Mark outlet location for future reference
- Don’t bury outlet (defeats purpose)
Outlet protection:
- Rodent guard (mesh over outlet)
- Prevents animals nesting in pipe
- Maintains flow whilst blocking pests
- Simple hardware mesh adequate
- Check and clear periodically
Outlet stability:
- Protect outlet from erosion
- Stone or gravel splash pad
- Prevents undermining outlet pipe
- Directs flow away from property
- Part of overall stormwater management
Multiple walls or tiers:
- Upper tier ag pipe outlets at mid-tier level
- Lower tier ag pipe outlets at base
- Cascading drainage prevents water accumulation any level
- Each tier requires its own drainage
- Water must exit site, not accumulate between tiers
Gravel Backfill Zone
Gravel behind retaining walls provides essential drainage capacity.
Gravel Zone Requirements
Minimum dimensions:
- 300mm wide gravel zone behind wall
- Full height of wall (base to top)
- Wider better (400-600mm ideal where space permits)
- Clay soils: 400mm+ minimum
- Sandy soils: 300mm adequate
Why thickness matters:
- Thin gravel zones (100-150mm) clog quickly
- Adequate volume provides drainage capacity
- Buffer between soil and wall
- Prevents direct soil pressure against wall
- Storage capacity during heavy rain
Gravel specifications:
- 10-20mm blue metal or crushed rock
- Clean (minimal fines)
- Free-draining
- Angular (compacts better than round pea gravel)
- Same as ag pipe surround material
Volume estimation (10m wall x 1m high x 0.3m deep):
- 3 cubic metres gravel
- Weighs approximately 5 tonnes
- Cost: $150-300 delivered
- Cheap relative to wall cost
- Don’t skimp on quantity
Geotextile Fabric
What it is:
- Woven or non-woven synthetic fabric
- Separates gravel from soil
- Filters water whilst blocking soil particles
- Prevents gravel zone clogging
- Industry standard inclusion
Function:
- Stops soil migrating into gravel (clogging)
- Allows water through
- Maintains gravel drainage capacity long-term
- Simple, inexpensive, highly effective
- Essential component, not optional extra
Installation:
- Line excavation behind wall before gravel
- Run fabric up retained soil face
- Overlap gravel zone completely
- Overlap joins 300mm minimum
- Fold over top of gravel before soil backfill
Cost:
- $2-5 per square metre
- Minimal expense
- 10m x 1.5m wall = 15 square metres = $30-75
- High value relative to cost
- Never omit to save $30
Types:
- Non-woven geotextile most common (filtration)
- Woven geotextile (structural, probably overkill)
- Heavy-duty grades available (longer life)
- Standard landscape fabric adequate
- Available any landscape or building supplier
Backfill Sequence
Correct layering (from wall face out):
- Wall structure (sleepers, blocks, stone)
- Ag pipe at base in gravel
- 300mm+ gravel zone (full height)
- Geotextile fabric against gravel
- Retained soil beyond geotextile
Backfilling procedure:
- Place gravel in lifts (300mm layers)
- Compact gently with plate compactor or hand tamper
- Don’t over-compact (reduces drainage)
- Continue up wall as construction progresses
- Backfill soil beyond gravel zone as final step
Soil backfill beyond gravel:
- Use excavated material or better-draining soil
- Compact in layers (prevent settling)
- Grade away from wall crest (surface drainage)
- Topsoil for planting
- Never backfill directly against wall (eliminates drainage)
Compaction:
- Gravel: gentle compaction (maintains voids)
- Soil: firm compaction (prevents settling)
- Heavy machinery risks damaging wall
- Hand methods adequate for residential walls under 1m
- Balance stability and drainage
For broader drainage solutions including surface water management and clay soil challenges, see our guide on garden drainage fixes for Victorian yards.
Weep Holes Through Wall Face
Solid walls require weep holes to drain water that reaches wall face.
When Weep Holes Essential
Mortared masonry walls:
- Brick or block walls with mortar joints
- Impermeable wall face traps water
- Weep holes provide drainage escape
- Every mortared wall needs weep holes
- Non-negotiable building practice
Concrete walls:
- Poured concrete retaining walls
- Solid impermeable barrier
- Must have drainage through wall
- Weep holes or drainage pipes essential
- Water has nowhere else to go
Rendered or sealed walls:
- Any coating that seals wall face
- Renders, paints, sealers
- Blocks natural drainage through joints
- Requires weep holes
- Installed before rendering
Dry-stack or gapped walls:
- Timber sleeper walls (horizontal gaps between sleepers)
- Dry-stack stone walls (gaps between stones)
- Self-draining by design
- Weep holes unnecessary (natural gaps drain)
- Concrete sleeper walls with spacers self-draining
Weep Hole Specifications
Diameter:
- 50-100mm (2-4 inch) typical
- PVC pipe cut to wall thickness
- Large enough to resist clogging
- Too small = clogs easily
- Standard size 65mm or 100mm PVC pipe
Spacing:
- Every 1.5-2 metres horizontally
- Stagger vertically if multiple courses
- More holes better than fewer
- Clay soils or poor drainage: closer spacing
- Never more than 2.5m between holes
Height placement:
- Bottom course or just above ground level
- Where water accumulates at base
- Above finished ground level (visible outlet)
- High enough to avoid soil blocking
- Typically 100-200mm above ground
Installation:
- Cut PVC pipe to wall thickness
- Insert through wall during construction
- Slope slightly outward (encourage drainage)
- Backfill gravel to weep hole level behind wall
- Water flows from gravel through weep hole out wall face
Weep Hole Details
Rodent protection:
- Mesh or grate over exterior opening
- Prevents animals nesting in holes
- Maintains drainage whilst blocking pests
- Hardware mesh adequate
- Essential in areas with rodents
Gravel pocket behind weep hole:
- Gravel zone must extend to weep hole
- Water flows through gravel to hole
- If soil behind weep hole, it doesn’t work
- Connect drainage zones properly
- Hole only works if gravel behind it
Visual check:
- Weep holes should discharge water during rain
- Dry weep holes indicate blockage or inadequate drainage
- Visible confirmation system working
- Inspection after heavy rain advisable
- Clear blockages promptly
Cleaning:
- Occasionally weep holes clog (soil, roots, debris)
- Wire or water jet clears blockages
- Access from wall face easier than behind wall
- Part of minimal ongoing maintenance
- Annual inspection adequate
Surface Water Management
Water flowing toward walls from upslope saturates drainage systems.
Divert Surface Water
Grading:
- Grade soil away from wall crest
- Minimum 2% slope (1:50 fall)
- Directs rainfall away from wall
- Prevents water infiltrating retained soil
- Simple but essential
Swales or drains:
- Shallow depression parallel to wall crest
- Intercepts surface water before it reaches wall
- Directs water to drainage outlet
- Particularly important clay soils
- Low cost prevention
Paving or hard surfaces:
- Patio or paving above wall
- Drains water away from wall edge
- Prevents infiltration through planted soil
- Reduces load on drainage system
- Effective but more expensive solution
Downpipes and irrigation:
- Never discharge downpipes near retaining walls
- Direct irrigation away from wall
- Concentrated water enormous problem
- Easily avoidable causes of failure
- Check during design phase
Planting Considerations
Plant selection:
- Avoid trees with aggressive roots
- Large trees can destabilise walls
- Roots interfere with drainage pipes
- Choose small shrubs and perennials
- Grass acceptable above walls
Irrigation:
- Drip irrigation better than sprinklers (less water)
- Direct water away from wall edge
- Avoid over-watering
- Saturated soil increases pressure
- Water management part of drainage strategy
Mulch:
- Organic mulch above wall
- Reduces water infiltration
- Moderates soil moisture
- Improves planting success
- Minimal erosion control benefit (grading more important)
Costly Mistakes to Avoid
Common errors that lead to premature wall failure.
False Economies
Skipping ag pipe:
- Saves $100-300 materials
- Costs $2,000-10,000+ when wall fails
- Worst false economy in retaining wall construction
- Never skip ag pipe to save money
- Short-term savings, long-term disaster
Thin gravel zone:
- 100mm gravel instead of 300mm
- Saves $100-200
- Inadequate drainage capacity
- Clogs within few years
- Rebuilding costs 5-10x savings
No geotextile fabric:
- Saves $30-100
- Gravel zone clogs with soil migration
- Drainage fails within 5-10 years
- Cheap insurance against expensive failure
- Never omit fabric
Wrong pipe:
- Solid pipe instead of ag pipe
- Saves nothing (same price)
- Doesn’t collect water (pointless installation)
- Drainage appears complete but non-functional
- Common mistake by inexperienced builders
Installation Errors
Ag pipe slots facing up:
- Silt immediately clogs upward-facing slots
- Renders pipe useless
- Simple mistake with serious consequences
- Install slots down or sideways (never up)
- Check before backfilling (can’t fix later)
Ag pipe without outlet:
- Pipe installed but goes nowhere
- Water collects in pipe but can’t exit
- Appears correct but non-functional
- Must outlet to daylight or stormwater
- Verify outlet before backfilling
Crushed ag pipe:
- Heavy machinery drives over pipe during construction
- Collapses pipe, blocks flow
- Common on larger projects
- Protect pipe during backfilling
- Inspect before burying
Compacted gravel:
- Over-compaction destroys drainage voids
- Gravel becomes nearly impermeable
- Heavy machinery compacts excessively
- Gentle compaction only
- Hand methods safer for drainage zones
Design Oversights
No fall on ag pipe:
- Level pipe doesn’t flow
- Water sits in pipe (doesn’t drain)
- Minimum 1:100 fall essential
- Check with spirit level and string line
- Test with water before backfilling
Inadequate outlet:
- Pipe outlets into low area that floods
- Water backs up pipe during rain
- Outlet must be lower than wall base
- Consider seasonal water table
- Outlet must function year-round
Ignoring groundwater:
- High water table areas
- Springs or seepage zones
- Permanent water source behind wall
- May require professional drainage design
- Standard ag pipe insufficient (need subsoil drainage)
Multiple tiers without drainage:
- Tiered walls each need drainage
- Water accumulates between tiers
- Upper tier drainage must outlet before reaching lower tier
- Cascading drainage essential
- Each level treated as separate wall
For comparison of retaining wall material options and their specific drainage requirements, see our comprehensive guide on retaining wall ideas for Australian properties.
Professional vs DIY Drainage
DIY-Appropriate Drainage
Low walls (under 600mm):
- DIY drainage manageable
- Ag pipe and gravel within DIY capability
- Straightforward installation
- Good project for experienced DIY builders
- Proper technique essential (read instructions)
Simple sites:
- Level or gentle slopes
- Sandy well-drained soils
- Clear outlet available
- No groundwater issues
- Accessible for materials and equipment
Adequate time and planning:
- Research proper techniques
- Quality materials
- Take time to install correctly
- Don’t rush drainage work
- Measure twice, install once
When to Hire Professional
High walls (over 1m):
- Engineering required (typically)
- Drainage design more critical
- Consequences of failure more severe
- Professional installation strongly recommended
- Building permits often required
Clay soils or poor drainage:
- Professional drainage design advisable
- May require subsoil drainage
- Complex water management
- Expensive if wrong
- Expert assessment worthwhile
Groundwater or springs:
- Permanent water sources behind wall
- Standard drainage may be inadequate
- Professional geotechnical assessment
- Specialised drainage solutions
- Not DIY territory
Council requirements:
- Engineered plans required
- Building permits
- Certification of drainage installation
- Professional documentation
- Approval conditions
Property value considerations:
- High-value properties
- Visible street frontage
- Expensive landscaping
- Consequences of failure severe
- Professional work provides peace of mind
Professional Drainage Cost
Typical additions to wall cost:
- Ag pipe and gravel: $30-60 per linear metre
- Professional installation: included in wall build
- Engineering (if required): $800-2,500
- Total drainage: 10-20% of wall construction cost
- Cheap relative to reconstruction after failure
Value proposition: Proper drainage costs $300-1,000 for typical residential wall. Rebuilding failed wall costs $3,000-15,000+. Drainage insurance costing 10-20% of project prevents 100% loss from failure. Never false economy.
Final Thoughts
Retaining wall drainage determines long-term survival more than material choice or construction quality. Hydrostatic pressure from water accumulation behind walls creates forces that exceed structural design capacity, causing bowing, cracking, tilting, and eventual collapse regardless of wall material or construction quality. Proper drainage prevents these failures through three essential components: agricultural pipe at wall base, adequate gravel backfill zone, and weep holes through solid wall faces.
Essential drainage components:
- 100mm ag pipe at wall base, slots facing down, surrounded by gravel, outlet to daylight or stormwater
- 300mm minimum gravel backfill zone (400mm+ in clay), full wall height, separated from soil by geotextile fabric
- Weep holes every 1.5-2m through mortared or concrete walls (dry-stack walls self-draining)
- Surface water graded away from wall crest, preventing concentrated flows toward wall
Cost vs value: Proper drainage materials cost $300-1,000 for typical residential retaining wall (10m length x 0.6-1m height). Rebuilding failed wall costs $3,000-15,000+ including demolition, removal, and reconstruction. Drainage represents 10-20% of project cost, prevents 100% loss from preventable failure. Never false economy skipping drainage to reduce initial costs.
Material quantities (typical 10m x 1m wall):
- Ag pipe: 12-15m (length plus outlets)
- Gravel: 3-4 cubic metres (300-400mm zone)
- Geotextile: 15-20 square metres
- PVC weep hole pipe: 5-8 pieces (mortared walls)
- Total materials: $300-600 depending on suppliers
Clay soil special considerations: Peninsula and Melbourne clay soils hold water, creating worst-case conditions for retaining walls. Clay requires wider gravel zones (400mm+), closer weep hole spacing, and meticulous surface water diversion. Clay sites benefit from professional drainage design. Sandy Peninsula soils drain naturally (easier drainage installation) but still require proper drainage components (insurance against heavy rain events).
Installation sequence: Drainage installed during wall construction, not retrofitted afterward. Ag pipe laid at excavation base before wall footing. Gravel backfilled in lifts as wall rises. Geotextile fabric prevents soil migration into gravel. Weep holes installed during wall construction. Surface grading completed after wall finished. Attempting to add drainage after wall complete expensive and rarely effective.
DIY vs professional: Low walls (under 600mm) on well-drained sites suit capable DIY installation following proper techniques. High walls (over 1m), clay soils, groundwater presence, or council requirements warrant professional installation. Drainage mistakes discovered years later after wall fails. Professional installation provides peace of mind, particularly high-value or highly visible walls.
Common failures prevented: Skipping ag pipe (dooms wall to eventual failure), thin gravel zones (clog quickly), ag pipe without outlet (collects water but doesn’t drain), slots facing up (immediate clogging), no geotextile fabric (soil migrates into gravel), and surface water directed toward wall (overwhelms drainage). Every common failure preventable through proper drainage techniques and adequate materials at modest cost during construction.
Long-term maintenance: Properly installed drainage requires minimal maintenance. Annual inspection of weep holes (clear blockages), ag pipe outlets (confirm flow), and surface grading (maintain fall away from wall) sustains performance indefinitely. Trees near walls monitored for root interference with drainage pipes. Heavy rain events provide functional test (weep holes should discharge water, no pooling behind wall, no bowing or cracking).
Retaining wall drainage represents essential infrastructure that costs relatively little during construction yet prevents catastrophic failures costing 5-10 times initial project investment to correct. Melbourne and Peninsula properties demand proper drainage regardless of wall height, material, or location. Water management determines whether retaining walls last decades or fail within years, making drainage the single most important aspect of successful retaining wall projects across Australian residential landscapes.
Need a Hand?
Professional lawn and garden services when you need them. Get a quote from our trusted Peninsula partners.
Contact Mowing Magic or Peninsula Hard Yards →Disclosure: We share links to related local services that serve our readers in the Peninsula area.